Powering Your Repeater
Once a repeater site has been chosen and the antenna is in place, the next practical question is how to keep the station powered and available with as little ongoing attention as possible. A repeater only helps the mesh while it is running.
What Makes a Site Practical
Elevation and a clear view matter for radio performance, but a useful site also needs to be practical to power and maintain. Key considerations include:
- Power availability — Continuous power (grid, reliable solar, or a combination) keeps the repeater online. Sites that require frequent battery changes are less helpful over time.
- Accessibility — You (or someone you trust) need to be able to reach the site for installation, occasional maintenance, and troubleshooting.
- Permission and permanence — Make sure you have the right to place equipment there and that the site is unlikely to change unexpectedly.
- Community benefit — A site that fills a real coverage gap for several users is more valuable than one that mainly improves coverage for a single station.
Ideal radio locations and ideal practical locations are not always the same. Most successful sites involve some compromise. Whenever possible, test a location with a temporary setup before committing to a permanent installation.
Power Sources
Most repeater sites use one of three approaches:
- Grid power — Simplest when it is available and reliable. A small UPS or battery backup can bridge short outages.
- Solar — Common for hilltop or remote sites. A basic system needs a panel, charge controller, and battery sized for the radio’s actual consumption and local weather.
- Battery only — Workable for testing or very low-power temporary sites, but usually impractical for a permanent repeater unless someone can swap or recharge batteries regularly.
Whatever source you use, the goal is the same: the repeater should stay online through normal nights, cloudy periods, and brief outages without requiring frequent visits.
Solar Power for Repeaters
Many good repeater sites do not have easy access to grid power. Solar is a common and practical solution. A basic system needs a solar panel, a charge controller, and a battery sized for the radio’s actual use and local weather.
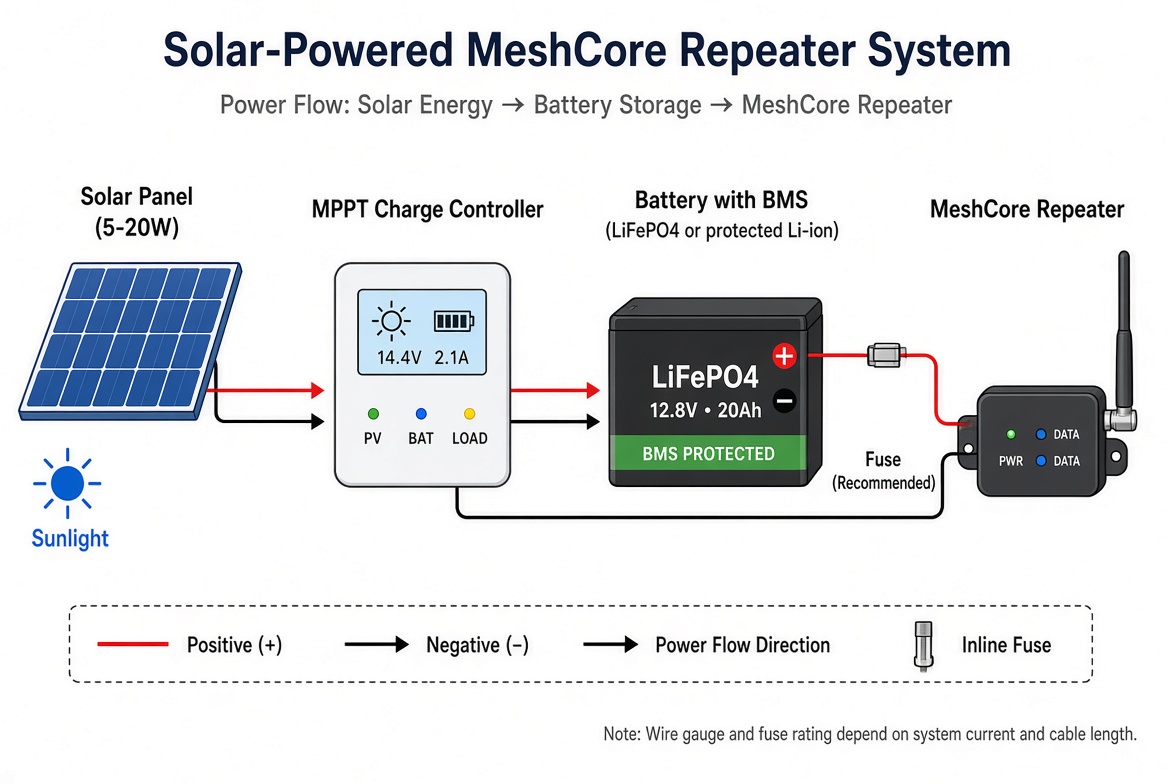
Typical solar repeater setup: panel → MPPT charge controller → protected battery → repeater. A fuse on the battery positive is recommended.
How Large a Solar Panel Do I Need?
Size the panel from the repeater’s average daily energy use, not its peak current. Typical MeshCore/LoRa repeaters (RAK4631-class boards plus radio) often average 15–40 mA, or roughly 1–3 Wh per day, depending on traffic and settings.
A practical rule of thumb:
- Panel wattage ≈ (daily Wh × 1.5 to 2) ÷ peak sun hours in your area
- In much of the U.S. (3–5 peak sun hours), a 5–10 W panel is usually enough for a modest repeater
- 10–20 W gives comfortable margin for winter, clouds, or higher power draw
Undersizing the panel is the most common reason solar repeaters go offline in winter.
What Is MPPT and Why Is It Better?
MPPT stands for Maximum Power Point Tracking. A solar panel produces different combinations of voltage and current depending on sunlight, temperature, and load. There is one point (the maximum power point) where it delivers the most watts. An MPPT controller continuously adjusts to stay near that point and converts the power efficiently to the battery voltage.
Compared with a simple PWM or linear charger, MPPT typically harvests 10–30 % more energy from the same panel, especially in partial sun, early or late day, or cold weather. It also lets you use higher-voltage panels with a lower-voltage battery. For a low-power repeater the absolute wattage is small, yet the extra energy often determines whether the site stays up through a string of cloudy winter days.
Matching the Panel Voltage to the Charger
The panel’s voltage must stay inside the input range the charger or controller can accept. Smaller panels come in different voltage classes:
- 5–6 V panels — Open-circuit voltage usually under 7 V. These match many onboard LoRa-board chargers.
- 12 V nominal panels — Open-circuit voltage often 18–22 V. These need an external controller that can accept the higher voltage and step it down.
Always check the panel’s Vmp (voltage at maximum power) and Voc (open-circuit voltage). Cold weather raises Voc, so leave some headroom.
- Onboard chargers on many LoRa boards accept only about 6–6.5 V maximum. A 12 V panel will usually damage them or simply not work.
- External MPPT controllers commonly accept 12 V (and higher) panels. Confirm the controller’s maximum Voc and recommended operating range before buying.
Wattage and voltage are independent. A 10 W panel can be either 6 V or 12 V class; the controller must match the voltage.
Onboard Charger vs. External Controller
Many LoRa/RAK-style boards include a simple onboard charger intended for a small Li-ion cell and a 5–6 V panel.
- Onboard is fine for a minimal single-cell test setup whose panel never exceeds the charger’s limits.
- An external controller is better when you want MPPT efficiency, higher-voltage panels, proper low-voltage disconnect, LiFePO₄ support, or a larger battery.
For anything beyond a short-term experiment, an external controller is the more robust choice.
Choosing an External Controller
Look for:
- MPPT (rather than PWM)
- Input voltage range that matches your panel
- Support for your battery chemistry (Li-ion or LiFePO₄)
- Low-voltage disconnect
- A modest current rating (5–10 A is plenty)
Small dedicated 1S MPPT modules, compact commercial units, and controllers explicitly rated for LiFePO₄ are all used successfully. Avoid poorly documented controllers that lack low-voltage cutoff.
How Large a Battery Do I Need?
Size the battery for the number of cloudy days you want to survive. Example: a 2 Wh/day load and three days of autonomy calls for roughly 6–8 Wh of usable capacity. A single protected 18650 or a small 3–5 Ah LiFePO₄ pack is often enough; 10–20 Ah gives better winter margin.
Li-ion vs LiFePO₄ for Outdoor Use
- Li-ion / LiPo (including common 18650 cells) — Higher energy density and lower upfront cost, but shorter cycle life (typically a few hundred cycles), more sensitive to over-charge and heat, and greater capacity loss in freezing temperatures. Acceptable for testing or very small builds if protected cells and a proper charger are used.
- LiFePO₄ — Lower energy density and higher upfront cost, but much longer cycle life (thousands of cycles), better thermal stability, lower fire risk, and more predictable cold-weather behavior. Generally the better choice for a permanent unattended outdoor repeater.
For a fixed outdoor MeshCore site, LiFePO₄ is usually preferred.
Battery Protection
Yes, protection is necessary:
- Use a Battery Management System (BMS) or protected cells for over-charge, over-discharge, over-current, and short-circuit protection. Multi-cell packs also need balancing.
- Ensure low-voltage disconnect (in the controller or BMS) so the battery is not run into a damaging state.
- Add a fuse or breaker on the battery positive, use adequate wire gauge, and keep connections secure and dry.
A protected cell or a pack with a proper BMS addresses the main short-circuit and fire concerns. An unprotected paralleled pack is the configuration most likely to cause problems.
Practical Starter Configurations
- Minimal / test — 5–6 V, 5 W panel + onboard charger + one protected 18650. Simple, limited margin.
- Reliable single-cell — 5–10 W panel + small external MPPT + one or two protected 18650s or a small LiFePO₄. Good everyday choice.
- Robust outdoor — 10–20 W panel + MPPT controller with low-voltage disconnect + 5–20 Ah LiFePO₄ with BMS. Best for unattended sites.
Extra Tips
- Measure or estimate your actual average current before finalizing sizes.
- Keep cable runs short and use proper wire gauge to limit voltage drop.
- Mount the panel for best winter sun if the site must stay up year-round.
- A little extra panel or battery capacity is cheaper than a repeater that goes offline every January.
Solar does not have to be complicated. Start with a system sized for the radio’s real power draw and local conditions, use appropriate protection, and the repeater can stay online through typical weather with very little attention.
Reliability Basics
A few simple practices improve the chances a site stays up:
- Size solar and battery capacity with some margin for winter or stretches of poor weather.
- Protect connections from moisture and secure cables so wind or animals cannot easily disconnect them.
- Use a charge controller or low-voltage cutoff so batteries are not damaged by deep discharge.
- If the site is critical, consider a way to know when it goes offline (a simple monitoring check, a second path, or occasional remote status queries).
Perfect uptime is rarely necessary. A repeater that is available most of the time and can be restored without major effort is usually more valuable than an overly complex system that is difficult to maintain.
Checking That Your Repeater Is Helping
After a repeater is online, confirm that it improves the network. A station that powers up and forwards packets is not automatically useful; it needs to fill a gap, strengthen a weak path, or add helpful redundancy.
Simple checks include:
- New or better paths — Companions that previously could not reach each other now succeed, and path traces show the new repeater in the route.
- Reasonable signal levels — The repeater and the stations it serves can hear each other well enough for consistent communication.
- Actual use — Over a few days the repeater appears in real message paths, not only in tests.
- No obvious new problems — Congestion does not noticeably increase and existing routes are not degraded.
If the repeater is rarely used or only adds congestion, it is reasonable to adjust the antenna location, change region settings, or reconsider the site. The objective is useful coverage and reliability, not simply more stations on the air.
← Previous: Antennas and Placement
Continue to: Regions and Region Scopes →
Was this material helpful? Leave feedback or suggest a correction.