As you become more familiar with MeshCore, the app provides several tools that let you look more closely at the network around you.
These tools can help you discover other nodes, examine how another station may be reached, and better understand some of the information your Companion has learned about the mesh.
You do not need these tools simply to send and receive messages. They become useful when you want to look beyond the basic Contacts and Channels screens and begin exploring how your Companion interacts with the network.
Opening the Tools Menu
The MeshCore app includes a Tools menu containing several functions for exploring and examining the mesh.
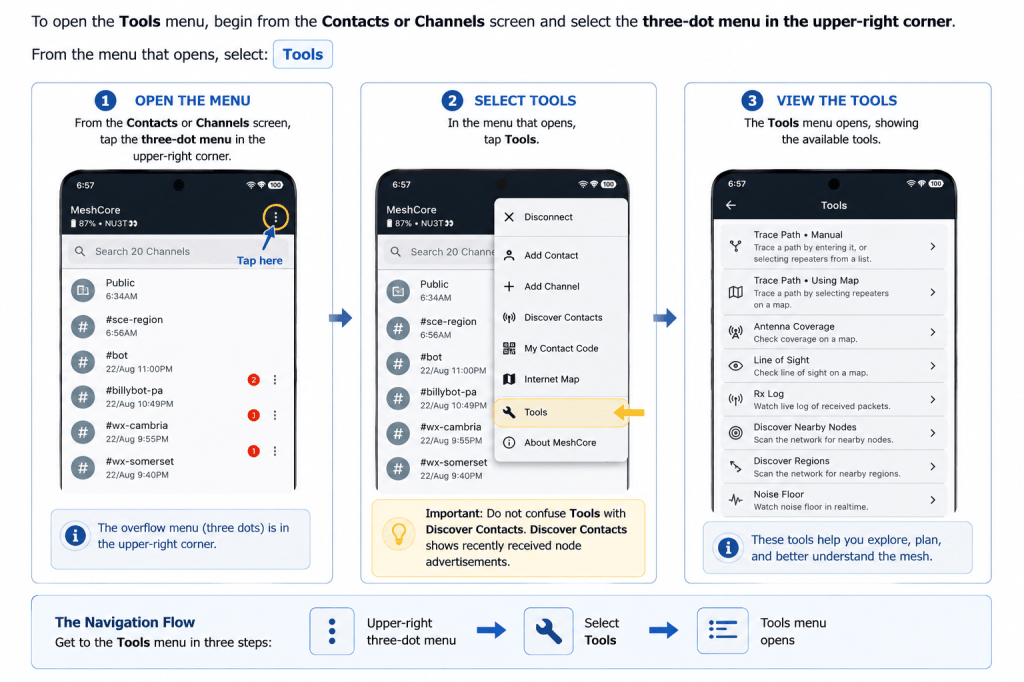
To open the Tools menu, begin from the Contacts or Channels screen and select the three-dot menu in the upper-right corner.
From the menu that opens, select:
Tools
Be careful not to confuse Tools with Discover Contacts, which appears in the same menu. Discover Contacts displays recently received node advertisements. Selecting Tools opens a separate collection of network exploration, planning, and diagnostic functions.
Depending on the app version and Companion configuration, the available tools may include functions for tracing paths, examining antenna coverage and line of sight, viewing received packets, discovering nearby nodes and regions, and observing the radio noise floor.
Not all of these tools serve the same purpose, and you do not need to learn all of them at once.
In this lesson, we will concentrate on the tools that are most useful for understanding and exploring the mesh during everyday operation.
Start With What You Already Know
In the previous lessons, you learned that your Companion can know about stations that are either Direct or reached through one or more repeaters.
You also learned that paths can change as your Companion receives new information about the network.
The Tools menu gives you ways to investigate some of that information more deliberately.
Rather than simply observing a path associated with a Contact, for example, you can use a path-tracing tool to examine how another station may be reached through the mesh.
Likewise, instead of waiting for new stations to appear through normal activity, discovery tools can help you look for other MeshCore nodes around you.
Think of the Tools menu as a way to ask your Companion for more information about the mesh it is participating in.
Tracing a Path
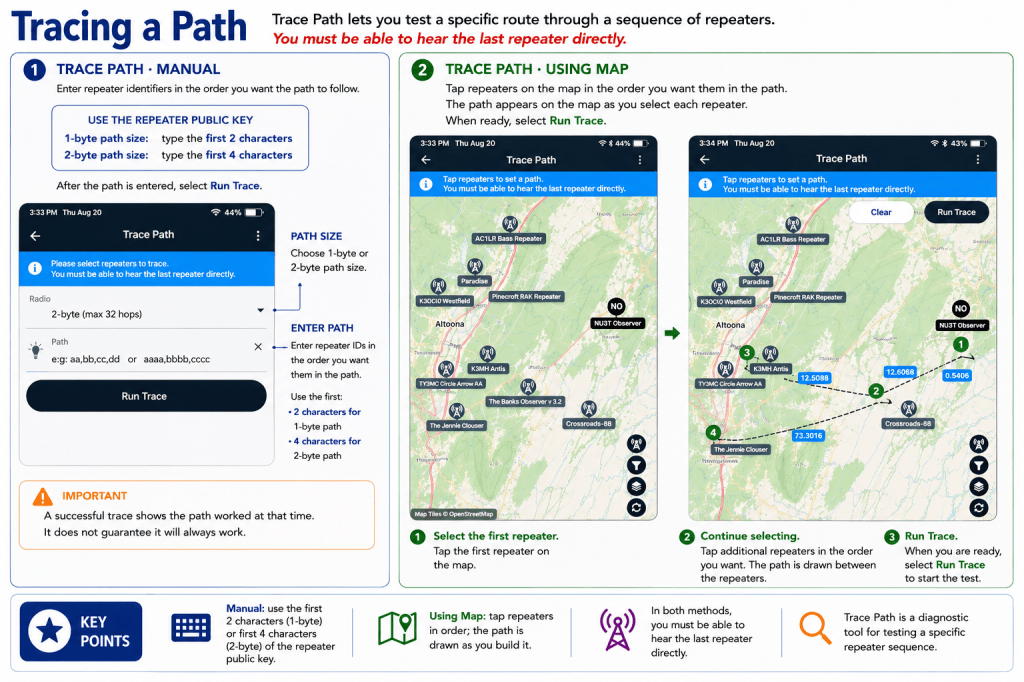
MeshCore’s Trace Path tools allow you to test a specific route through a sequence of repeaters.
This is different from normal MeshCore communication. You do not ordinarily need to construct a route manually when sending a message. Trace Path is a diagnostic tool that lets you deliberately test a particular repeater sequence.
The Tools menu provides two ways to construct the path:
Trace Path · Manual
Trace Path · Using Map
Both perform the same basic task. The difference is how you select the repeaters that make up the path.
Trace Path · Manual
Select:
Tools → Trace Path · Manual
Manual mode lets you enter the repeaters in the order you want the path to follow.
This is useful when you already know the repeater identifiers and want to test a particular sequence.
After entering the desired path, select Run Trace.
Trace Path · Using Map
Select:
Tools → Trace Path · Using Map
Using Map lets you construct the same type of path geographically.
Tap the repeaters on the map in the order you want them included. MeshCore draws the proposed route as you build it, making it easier to see both the repeater sequence and their geographic relationship.
When the desired path has been constructed, select Run Trace.
An Important Requirement
For either method:
You must be able to hear the last repeater in the path directly.
This is important because Trace Path is not asking MeshCore to find any available route. You are specifying a particular sequence of repeaters and testing whether that path works.
A successful trace shows that the tested path worked at that time. It does not guarantee that the same path will always work. Radio conditions, interference, network activity, and other changes in the mesh can affect later results.
Key Point: Trace Path is a diagnostic tool for testing a specific repeater sequence. Manual mode lets you enter that sequence directly; Using Map lets you construct and visualize it geographically.
Discovering Nearby Nodes
Trace Path is useful when you already know which repeaters you want to investigate. Sometimes, however, the first question is much simpler:
What MeshCore nodes are around me?
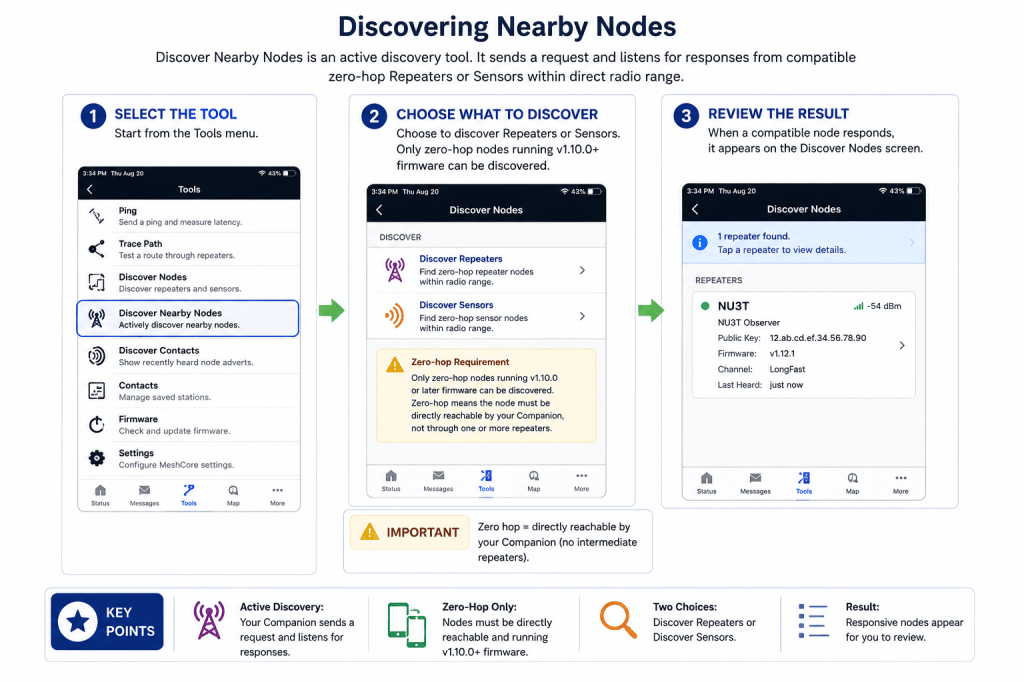
The Discover Nearby Nodes tool lets your Companion actively request information from compatible MeshCore nodes within direct radio range.
Select:
Tools → Discover Nearby Nodes
This opens the Discover Nodes screen. Unlike simply reviewing information your Companion has already received, this screen allows you to initiate a discovery request.
Two discovery choices are provided:
Discover Repeaters — sends a discovery request for nearby repeater nodes.
Discover Sensors — sends a discovery request for nearby sensor nodes.
MeshCore identifies an important limitation directly on this screen: only zero-hop nodes running v1.10.0 or later firmware can be discovered.
In this context, zero hop means the discovered node must be directly reachable by your Companion rather than reached through one or more intermediate repeaters.
When a compatible node responds, it appears on the Discover Nodes screen. This gives you a deliberate way to investigate which supported repeaters or sensors your Companion can communicate with directly at that time.
Key Point: Discover Nearby Nodes is an active discovery function. Your Companion sends a discovery request and listens for responses from compatible zero-hop Repeaters or Sensors.
Antenna Coverage
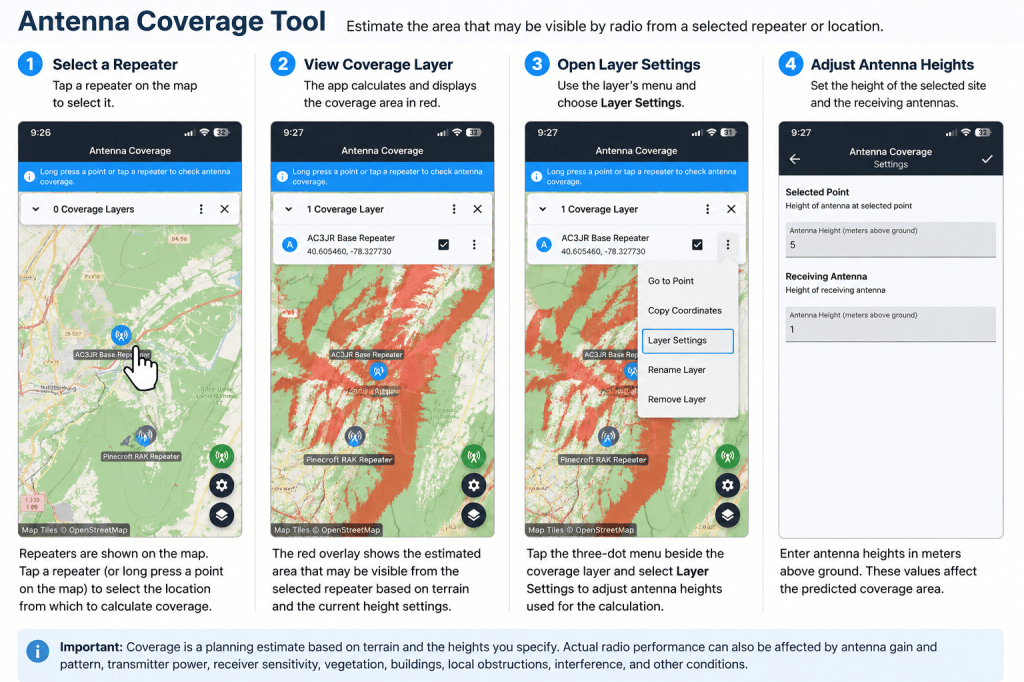
The Antenna Coverage tool provides a map-based estimate of the area that may be visible by radio from a selected location. It can be useful when examining an existing repeater site or considering where a new MeshCore node might provide useful coverage.
Select:
Tools → Antenna Coverage
The coverage map initially opens without any coverage layers. You can tap a repeater shown on the map to calculate coverage from that location. The instructions at the top of the screen also allow you to long-press a point on the map, which makes it possible to examine a location where a repeater may not already exist.
After a point or repeater is selected, MeshCore calculates the coverage layer and overlays the result on the map. In the example shown here, the selected AC3JR Base Repeater produces a red coverage area extending outward from its location.
The shape of the coverage area can be particularly informative. Radio coverage from an elevated site is rarely a perfect circle. Hills, ridges, valleys, and surrounding terrain can cause the predicted coverage to extend much farther in some directions than others.
Adjusting Antenna Heights
Each coverage layer has its own menu. Select the three-dot menu beside the coverage layer, then choose:
Layer Settings
Two antenna-height values can be adjusted:
Selected Point — Antenna Height
This is the height of the antenna above the ground at the repeater or location being evaluated.
Receiving Antenna — Antenna Height
This represents the assumed height above ground of the antenna at locations receiving the signal.
Both values are entered in meters above ground.
These settings matter because antenna height affects how terrain interacts with the radio path. A coverage estimate made for an antenna several meters above the ground may differ from one made for an antenna carried close to ground level.
Working With Coverage Layers
The Antenna Coverage tool can maintain coverage information as layers. The main three-dot menu provides additional controls, including Add Point, Import JSON, Export JSON, Select All, Deselect All, and Open in LOS Tool.
Individual layers can also be managed separately. Their menu provides options such as Go to Point, Copy Coordinates, Layer Settings, Rename Layer, and Remove Layer.
This makes it possible to examine more than one site and manage the resulting coverage information without treating every calculation as a separate map.
What the Coverage Map Means
The coverage overlay should be treated as a planning estimate, not a guarantee that MeshCore communication will succeed everywhere shown.
Actual radio performance can also be affected by antenna gain and pattern, transmitter power, receiver performance, feed-line losses, vegetation, buildings, local obstructions, interference, noise, and changing radio conditions.
The tool is therefore most useful for answering questions such as:
“From this location and antenna height, where does the terrain appear favorable for radio coverage?”
It does not replace an actual on-air coverage test.
Key Point: Antenna Coverage helps visualize how location, terrain, and antenna height may influence the useful coverage of a MeshCore site. It is a planning and evaluation tool rather than a prediction that every location inside the displayed area will receive the signal.
Line of Sight
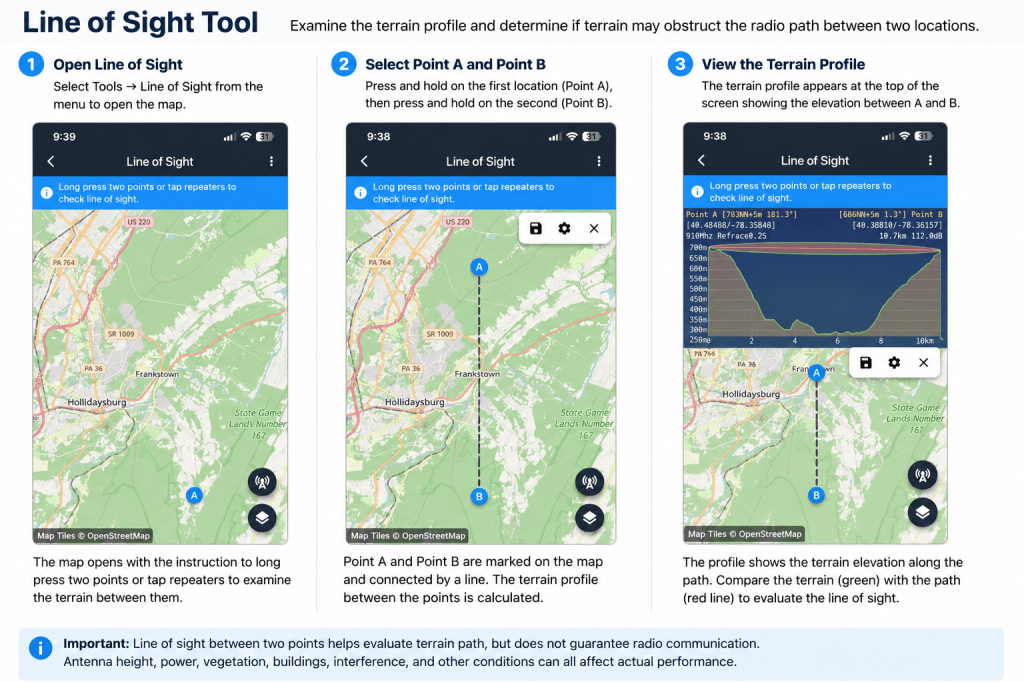
The Line of Sight tool lets you examine the terrain profile between two locations. This can help determine whether terrain may obstruct the direct radio path between two MeshCore sites.
Select:
Tools → Line of Sight
The tool opens a map with the instruction:
Long press two points or tap repeaters to check line of sight.
You can therefore examine a path between existing repeaters or select two arbitrary locations on the map.
Selecting the Two Locations
To examine two locations manually, press and hold the first point on the map, then press and hold the second point.
MeshCore marks the locations as Point A and Point B and draws a line between them.
Once both points have been selected, a terrain profile appears across the top of the screen.
The profile represents the elevation of the terrain between Point A and Point B. This provides a side view of the terrain that cannot be seen from the normal overhead map.
In the example shown here, the two selected locations are on relatively high terrain with a substantial valley between them. The terrain profile makes that relationship immediately apparent.
Understanding the Profile
The profile allows you to compare the terrain between the two endpoints with the path connecting them.
This is useful when evaluating questions such as whether a ridge rises between two proposed sites, whether two elevated locations appear to have a clear terrain path between them, or whether a site located in a valley is shielded by surrounding terrain.
A clear terrain profile is generally more favorable for radio communication than one in which terrain rises into the path.
However, line of sight should not be interpreted as a guarantee of radio communication. Antenna height and performance, transmitter power, receiver sensitivity, vegetation, buildings, interference, and other RF conditions can all affect the actual link.
Likewise, the absence of a simple unobstructed path does not by itself tell us everything about whether a LoRa signal may be received.
Antenna Coverage and Line of Sight Work Together
The two tools answer related but different questions.
Antenna Coverage helps you examine the area surrounding a site and see where terrain appears favorable for coverage.
Line of Sight examines the terrain relationship between two specific locations.
The Antenna Coverage tool even provides an Open in LOS Tool option, making it convenient to move from a general coverage examination to a more specific point-to-point terrain analysis.
Key Point: Use Antenna Coverage when you want to examine the potential coverage area surrounding a site. Use Line of Sight when you want to examine the terrain path between two particular locations.
Discover Regions
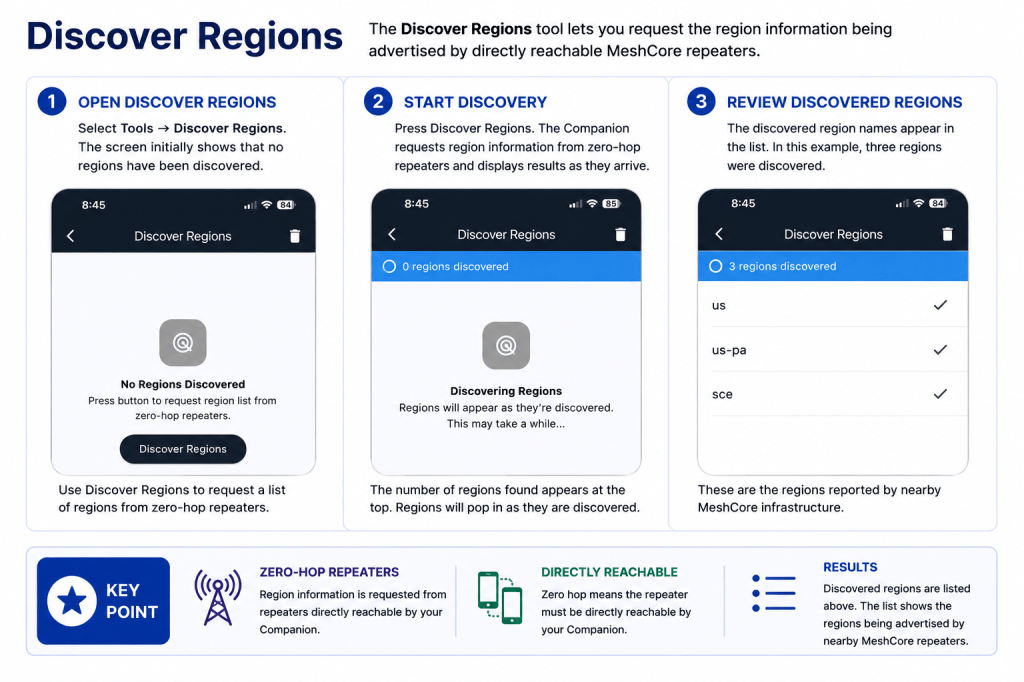
The Discover Regions tool lets you request the region information being advertised by directly reachable MeshCore repeaters.
Select:
Tools → Discover Regions
When the tool first opens, the screen displays No Regions Discovered and provides a Discover Regions button.
Press Discover Regions to begin the request. While discovery is taking place, the screen displays the number of regions found and notes that regions will appear as they are discovered. The process may take some time.
Understanding the Results
When region information is received, the discovered region names appear in a list.
In the example shown here, three regions were discovered:
us
us-pa
sce
These results show the regions reported through the discovery process. They can be useful for understanding what region scopes are being used by nearby MeshCore infrastructure.
Key Point: Discover Regions requests region information from zero-hop repeaters. In MeshCore, zero hop means the repeater must be directly reachable by your Companion rather than reached through another repeater.
Noise Floor
The Noise Floor tool provides an indication of the background radio-frequency energy being received by the MeshCore radio.
Select:
Tools → Noise Floor
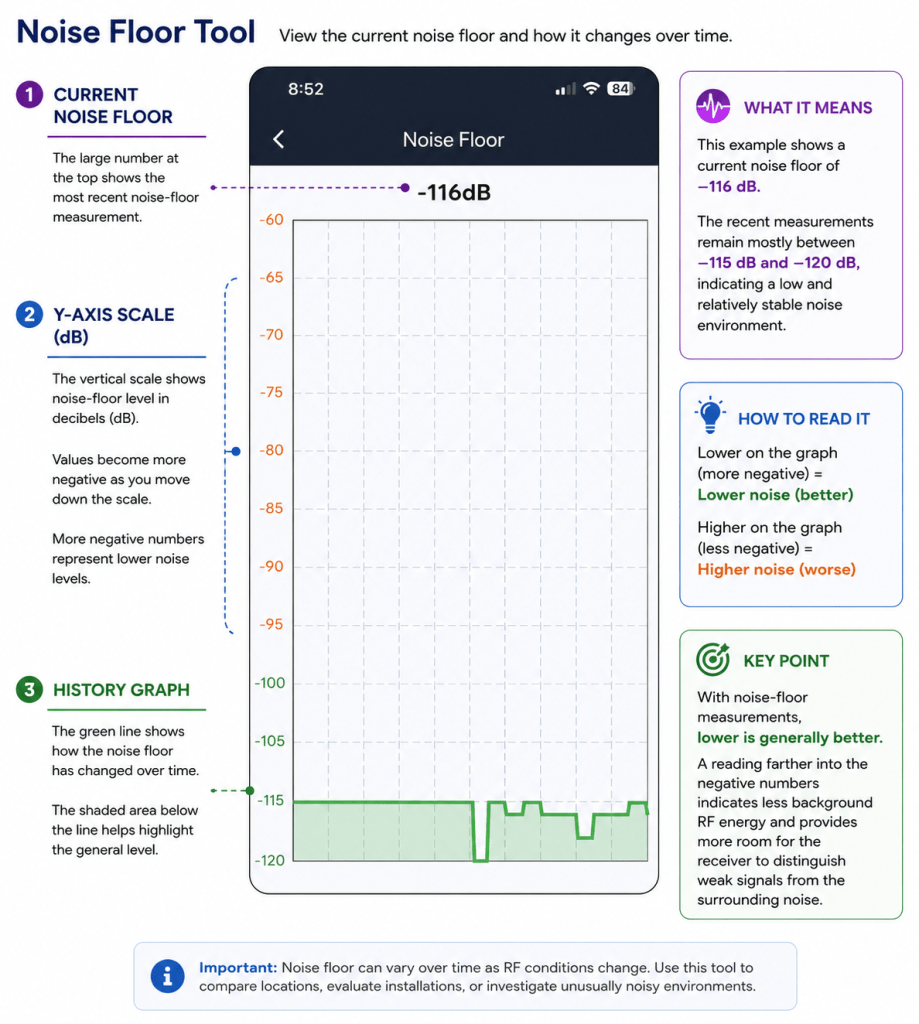
When the tool opens, the current noise-floor reading appears prominently at the top of the screen. The graph below shows how the measured noise level changes over time.
In the example shown here, the current reading is −116 dB, with the recent measurements generally remaining near the lower end of the displayed scale.
Understanding the Reading
Noise-floor readings are shown as negative values. A more negative number represents a lower noise level.
For example, −115 dB represents a lower noise level than −90 dB.
A lower noise floor generally provides a more favorable environment for receiving weak radio signals because there is less background RF energy competing with the signal the receiver is trying to detect.
The graph provides a visual history of the measurements. In the example shown, the noise floor remains relatively stable near −115 to −120 dB.
Why Noise Floor Matters
A MeshCore radio must distinguish incoming LoRa signals from the surrounding RF noise. As the noise floor rises, weaker signals may become more difficult for the receiver to detect reliably.
Background noise can come from the surrounding RF environment as well as nearby electronic equipment, power supplies, computers, other transmitters, and other sources of electrical or radio-frequency interference.
The Noise Floor tool can therefore be useful when evaluating an installation, comparing locations, or investigating whether a site has an unusually noisy RF environment.
Key Point: With noise-floor measurements, lower is generally better. A reading farther into the negative numbers indicates less background RF energy and provides more room for the receiver to distinguish weak signals from the surrounding noise.
Rx Log
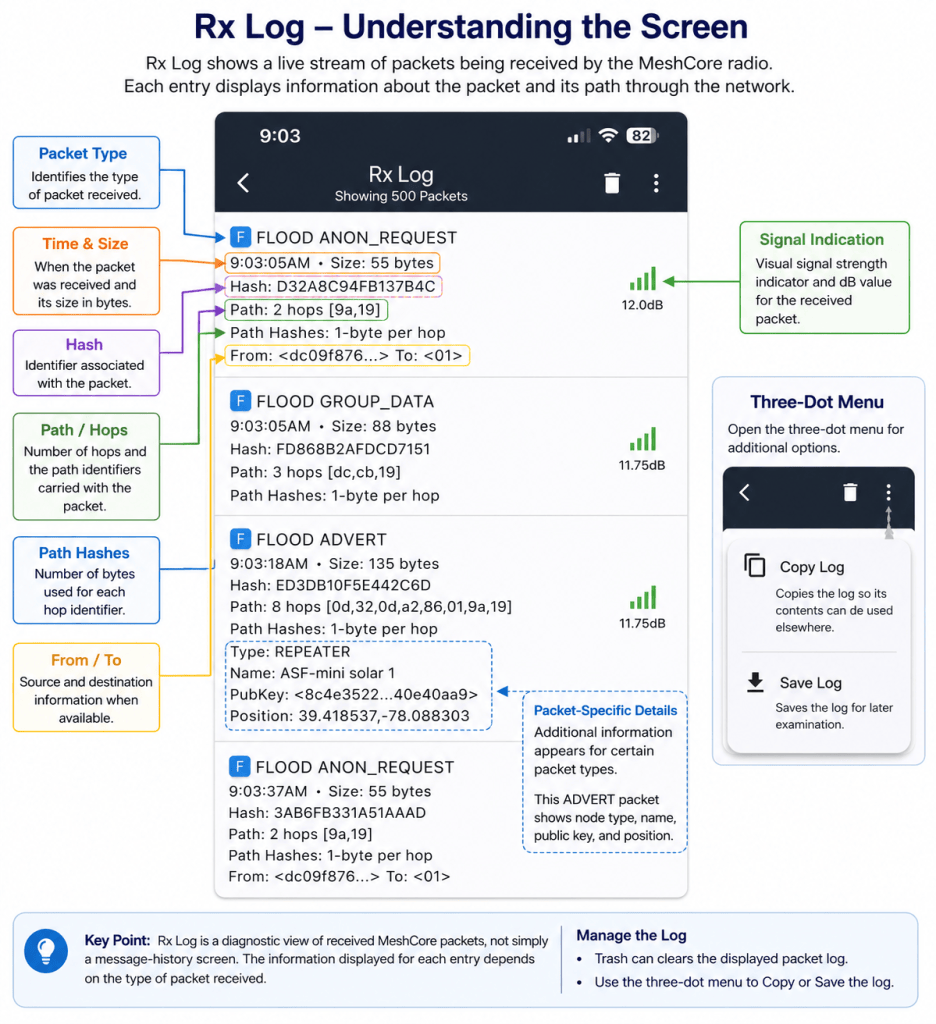
The Rx Log provides a live view of packets being received by the MeshCore radio. It is primarily a diagnostic tool that allows you to observe network activity and examine information associated with individual received packets.
Select:
Tools → Rx Log
When the tool opens, received packets appear in the log as they are detected. The screen can retain up to 500 packets, with the number currently being displayed shown beneath the Rx Log heading.
Understanding a Packet Entry
Each entry identifies the type of packet received and displays information available for that packet.
Depending on the packet type, the displayed information may include:
- Time — when the packet was received.
- Size — the size of the packet in bytes.
- Hash — an identifier associated with the packet.
- Path — the number of hops and the path identifiers carried with the packet.
- Path Hashes — the number of bytes used for each hop identifier.
- From / To — source and destination information when available.
- Signal indication — a visual signal indicator and a dB value for the received packet.
Additional information may appear for certain packet types.
For example, an ADVERT can include information such as the node type, name, public-key information, and position. A group-data packet may include channel information and message content.
The exact fields therefore vary according to the type of packet being examined.
Packet Types
The Rx Log displays network packets rather than simply showing a history of user messages.
In the example shown here, the log contains several types of flood packets, including FLOOD ANON_REQUEST, FLOOD GROUP_DATA, and FLOOD ADVERT.
These entries represent different kinds of MeshCore network activity. Not every packet shown in the Rx Log represents a message intended for you.
Managing the Log
The trash-can icon at the top of the screen can be used to clear the displayed packet log.
The three-dot menu provides two additional options:
Copy Log — copies the log so its contents can be used elsewhere.
Save Log — saves the log for later examination.
These functions can be particularly useful when troubleshooting or when packet information needs to be preserved and reviewed in greater detail.
Why Rx Log Is Useful
Rx Log provides a direct way to see that the radio is receiving MeshCore traffic and to examine the characteristics of that traffic.
It can be useful for observing packet activity, examining paths and hop counts, checking received signal information, and collecting diagnostic information when investigating network behavior.
Key Point: Rx Log is a diagnostic view of received MeshCore packets, not simply a message-history screen. The information displayed for each entry depends on the type of packet received.
Putting the Tools to Work
MeshCore’s tools provide different ways to examine the same network. Some help determine whether another node can be reached, others show how traffic moves through repeaters, and others help evaluate terrain, RF conditions, nearby nodes, regions, or the packets being received.
No single tool provides the complete picture. Ping and Trace Path can help investigate connectivity and routing. Antenna Coverage and Line of Sight help evaluate potential sites and terrain. Noise Floor and Rx Log provide a closer look at the local radio environment and received network traffic. The discovery tools help identify nodes and regional information available from the surrounding mesh.
As you become familiar with these tools, the important question becomes less “What does this tool do?” and more “Which tool will help me answer the question I have about the mesh?”
Key Point: The MeshCore tools are most useful when their results are considered together. They provide observations and diagnostic information that can help you understand, plan, and troubleshoot a MeshCore network.
Continue to: Configuring MeshCore Settings→

